

The Best Emulator for PS2
The Best Emulator for PS2 is PCSX2 version 1.4.0
Here is a short tutorial to check it out.
BIOS and game pad setup.
After installed the emulator you will get a wizard that lets you select the default plugins and the language for the interface. Leave the plugins as they are and click Next till you get to the section for BIOS setup. From there you can open the folder where you want to store the different BIOS of the games you want to add using the button for that purpose. Here we encounter our first dilemma questioning the legality of emulation.

Just to be clear, using emulators is totally legal, and for games that require a BIOS for the console to work, you can download them from the Internet in good conscience if you have a PlayStation 2. Google is your friend for these things, but if you want to take the plunge properly, you can extract them yourself from the console, which to be completely honest is not worth the hassle at this point.
The next preliminary step before getting down to the nitty-gritty with the graphic setup is the control system. While you could always opt for a keyboard, mapping each element, a game pad will give you an experience nearer the original, and the most advisable thing to save yourself problems is to turn to a USB game pad for Xbox 360: good, good-looking, cheap, and auto detected by Windows. The screenshot below shows the completed setup.

Setting up the graphics
First of all, go to Settings > Video > Plugin settings, the nerve center for setting up the graphics. You have to keep in mind that emulating PS2 is rather more demanding than other consoles, and it’s also true that it will run much better on Intel than AMD processors, although that doesn’t mean that the latter can’t do a more than acceptable job. In this case we’ve used two computers, a pimped-out desktop with a high-range i5, 8GB of RAM, and ATI R9 28oX, and then a Sony Vaio laptop with i3. The desktop emulated with all the parameters at their max with a decent frame rate. The second had no problems with the native resolution and allows texture filtering and light scaling without many problems.Here is a summary of the options to keep in mind. The ones not mentioned are better to leave alone for the impact they have on performance, although there are no fixed guidelines and you have to tick and untick options till you find the ideal equilibrium between performance and graphic quality. Also you should note that each game is a world unto itself, and depending on how heavy it is on the graphics or internal optimization within the emulator, the results will vary enormously, particularly if the graphics are in 3D.

- Adapter: Leave this one as it is, as it selects the graphic adapter that you’re using by default.
- Renderer: Here you should select the default rendering system. In our case Direct3D gives better results than OpenGL. If you have a super tricked-out computer you can choose D3D11.
- Interlacing: This section lets you configure the interlacing mode for the image, that is, the system for drawing horizontal lines on the screen. At the beginning you can just leave it on Auto, but if you notice saw teeth with the image in motion (not those produced by the edges of polygons), you can try the option Bob ttf.
- Original PS2 Resolution: Here we’re going to assign the rendering resolution for 3D games. To avoid problems the best thing to do is use multiples of the original resolution, which you can access by clicking on the Custom field and select the best option from the drop-down menu. From 4x up it produces an awkward ghosting effect on the image. 3x is more than enough, as it equates to 1920×960.
- Enable FXAA: Ticking this option activates the antialiasing, which enormously improves the softening of the images by sketching them from a distance.
- Enable FX Shader: Activates the library of shaders that enormously improves the appearance of 3D figures.
- Texture Filtering: Activates the texture filter that adds a welcome blur effect at high resolutions with superimposed flat images.
- Anisotropic Filtering: Anisotropic filtering improves the textures of drawings at different angles. Like in the previous section, it greatly improves the quality of the 3D models. With 2X you should be more than good.
- Enable Anti-aliasing: It’s advisable to activate the anti-aliasing above all for resolutions lower than 720p, as if you don’t you’ll see artifacts in the image views, particularly the far-away ones when it attempts to interlace the image.

In terms of vertical synchronization, you usually can’t see the crop marks in most games, meaning it’s not really needed to activate the option that’s already covered by the performance.
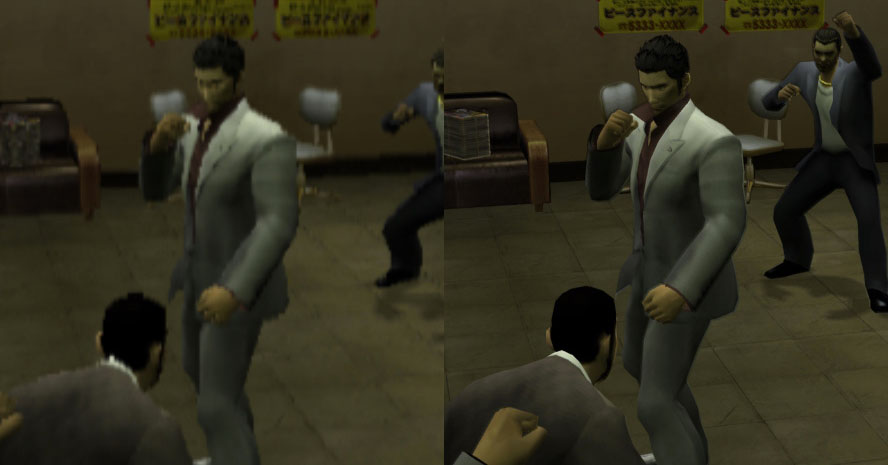
And now, finally, an example: to test the changes we’ve used the games Yakuza, ICO, and Dark Cloud. The differences are obvious. You can check out the images in a larger size HERE and HERE.


A step further
All this is the BASIC stuff you need to know to be able to set up your own economic HD version. Experience has shown that many of those reedits on the market do not actually include better graphics beyond the change in resolution, and thus for example the textures are exactly the same, with a good enough level of detail to look good on a higher resolution.On PCSX2 it’s not possible, but other emulators like Dolphin let you insert graphic packs into Wii and Gamecube games where users have replaced the original textures with completely new ones adapted to higher resolutions, often to even better result than those you’ll find in commercial remakes and revisions. Emulation is not an impediment to the industry, but a poke to help them get on the ball.
Download Link :
For Window : PCSX2 1.4.0
For Ubuntu : PCSX2 1.4.0
1. ISO Game 1
2. ISO Game 2
Special thanks to up to down site that has share this tutorial :
Source :http://blog.en.uptodown.com/pcsx2-tutorial-ps2/


.bmp)
No comments:
Post a Comment